Sunday, March 31, 2013

MailBird- A Beautiful Email Client for Windows

When it comes to desktop email client, there are quite a lot of free ones including Thunderbird and also the most popular (paid) Outlook. While Outlook is the most powerful email app, it is mostly for enterprise and home users does not need all of its features. But now, we have a beautiful new email app for Windows- MailBird. Mailbird offers a clean design with simple shortcuts and action buttons.
One of the best features of MailBird is that it eliminates clutter from your inbox and presents the emails in a beautiful app. You can connect with your Facebook account and add profile picture in the inbox if you receive emails from your Facebook friends.
Mail Bird
Organizing online communication is effortless with color coded labels, starring, and filtering important emails, so you no longer have a mess of random emails clogging up your inbox. The compose section is pretty good and it features almost all basic formatting options and also includes the option to attach files. It automatically fetches the emails from your address book.
Compose
MailBird comes with keyboard shortcuts as well to get more productive.
Shortcuts
There are quite a lot of settings available under options including connecting with Facebook account. You can also use Gmail shortcuts and enable them from the options.
Options
One of the main and most useful feature of MailBird is apps. It comes with an app section, apps are basically an extension to popular services inside the inbox. There are apps for Google drive, Dropbox, Calendar, Contacts etc. This means you can access your Google drive or Dropbox files right inside the email app once you have connected them. This concept is pretty awesome and we are sure to see more useful and productive apps in the future coming up.
Apps
As of now MailBird is not available to general public and the launch of this app is scheduled for 2nd of April in public beta. There are two versions available, one is the free version, which adds a small signature to all emails sent and second is the paid version which will remove the signature. Mailbird currently only supports Gmail or Google Apps account. Support for Yahoo Mail, Hotmail and more coming soon. Overall, we loved MailBird and it is really an awesome desktop app for Windows. We are sure there will be more features coming in the final builds.

Get MailBird

Friday, March 29, 2013

How can I close an app in Windows 8?

Microsoft wants to change the users Windows experience by having any open apps remain open until shutdown. Therefore, they have removed the file menu, close, minimize, and resize options in apps designed for Windows 8 and replaced them with the Windows 8 App commands. The App commands bar appears on the bottom portion of the screen (as shown in the below picture) when you swipe up or down from either edge or right-click in the app.
App commands in Windows 8
Although the App commands will give you additional options for the open app, it may still not give you the option to close the app. If you want to close the app follow any of the below suggestions.
  1. Move your mouse to the very top of the app, which should change the mouse cursor to a hand, then click-and-drag or swipe that app to the bottom of the screen. Once you let go of the app it will close.
  2. Move your mouse to the top-left corner of the screen and then move down to show all open apps, right-click the open app you want to close and choose Close.
  3. Press the Windows key + Tab to show open apps, right-click on the app you wish to close and click Close.
  4. Press Alt + F4 on the keyboard to close the app or any open program.

App commands

In Windows 8, the commands available for an open app are now hidden while the app is open. When you swipeup or down from either edge or right-click while the app is open the App commands (App bar) is shown at the bottom of the screen, as seen in the below picture. This bar is similar to the File menu you may find in previous versions of Windows. The App commands available in the bar will vary depending on the type of app currently open.
 

Window 8 Speed bump

In Windows 8, a speed bump is the name of the small gap found between groups of tiles. As can be seen in the below picture, the vertical gap between the group of tiles is the speed bump. To create new speed bumps drag one of the tiles to a speed bump.
Windows 8

Windows 8 Lock screen

The lock screen is a new feature introduced with Windows 8 that displays an image, the time and date, and can even show apps you wish to show such as your calendar, messages, and mail while the computer is locked. In the picture to the right, is an example of what the Windows 8 lock screen may look like. To get to the login screen from the lock screen swipe your finger up if you're using a touch screen, click and drag up if using a mouse, or press enter on the keyboard.

Tip: To lock the computer and show the lock screen press the Windows key + L.
Changing the Windows 8 Lock screen
  1. Open the Charms by moving the mouse to the right-hand side of the screen or pressing the Windows key + C keys on the keyboard.
  2. In Charms click Settings.
  3. In the PC settings menu click More PC settings at the bottom.
  4. In Personalize under Lock screen select the picture you want to use for the Lock screen.
Tip: At the bottom of the Lock screen section is Lock screen apps, which will allow you to add and remove apps from the Lock screen.
Getting out of the Lock screen
There are several ways to unlock the lock screen. Press the space bar, press enter, touch your finger and flip towards the top of the screen, or click your mouse and flick towards the top of the screen.

Start your computer in safe mode


       Safe mode starts Windows with a limited set of files and drivers. Startup programs don't run in safe mode, and only the basic drivers needed to start Windows are installed. For more information, see What is safe mode?
Safe mode is useful for troubleshooting problems with programs and drivers that might not start correctly or that might prevent Windows from starting correctly. If a problem doesn't reappear when you start in safe mode, you can eliminate the default settings and basic device drivers as possible causes. If a recently installed program, device, or driver prevents Windows from running correctly, you can start your computer in safe mode and then remove the program that's causing the problem. For more information about troubleshooting problems in safe mode, see Diagnostic tools to use in safe mode.
  1. Remove all floppy disks, CDs, and DVDs from your computer, and then restart your computer.
    Click the Start button Picture of Start button, click the arrow next to the Shut Down button Picture of Shut Down button, and then click Restart.
  2. Do one of the following:
    • If your computer has a single operating system installed, press and hold the F8 key as your computer restarts. You need to press F8 before the Windows logo appears. If the Windows logo appears, you'll need to try again by waiting until the Windows logon prompt appears, and then shutting down and restarting your computer.
    • If your computer has more than one operating system, use the arrow keys to highlight the operating system you want to start in safe mode, and then press F8.
  3. On the Advanced Boot Options screen, use the arrow keys to highlight the safe mode option you want, and then press Enter. For more information about options, see Advanced startup options (including safe mode).
  4. Log on to your computer with a user account that has administrator rights.
When your computer is in safe mode, you'll see the words Safe Mode in the corners of your monitor. To exit safe mode, restart your computer and let Windows start normally.

Disappearing menus


Context menu


Windows 7's Explorer has a potentially confusing hidden rule that you need to understand. If you select more than 15 files or folders, and right-click one of them, you'll find that the 'Open' and 'Edit' context menu options, and maybe some third-party options have disappeared.
It turns out Microsoft removes these so you can't accidentally carry out time-consuming actions on a lot of files, but if you'd rather be able to make your own decisions about that, then there's an easy solution.
Launch regedit, go to HKCU\Software\Microsoft\Windows\CurrentVersion\Explorer, and look for the DWORD value MultipleInvoke PromptMinimum. You can create it if it isn't there. Set this to a value higher than 15, and after a reboot Windows Explorer will no longer hide menu options unexpectedly.

Access from virtually anywhere


Store any file on your SkyDrive and it's automatically available from your phone and computers—no syncing or cables needed. If you'd like 7 GB of free storage for your files, and want your documents, notes, and photos to be accessible from your devices, then sign up for a SkyDrive account.

Get SkyDrive

What happened to the Quick Launch toolbar?


The Quick Launch toolbar isn't included in this version of Windows. To open programs quickly, you can pin them to the taskbar. For more information, see Pin a program to the taskbar.
To open files, folders, or websites quickly, you can pin them to the program's Jump List. You can use Jump Lists to get to recently-opened items. For more information, see Using Jump Lists to open programs and items.
Picture of a Jump List on the taskbarOpen recent and pinned items using the Jump List

Disable Action Center Notifications

The Action Center included with Windows provides a variety of messages, including ones about available Windows updates, your firewall, and whether you have antivirus softwareinstalled. There are also messages that prompt you to run regular backups and troubleshoot problems with Windows or your applications when crashes or freezes occur.
If you never want to see these messages, you can disable all Action Center notifications completely. First, open the Action Center by clicking the flag-shaped icon in your system tray and selecting Open Action Center. Click the Change Action Center settings option in the sidebar and uncheck all the types of notifications you don’t want to receive.
windows problem
If you’re still encountering other annoying desktop notifications, read 5 Distracting Desktop Notifications & How To Turn Them Off.

Privacy features

Chrome offers several privacy features that help protect you while you browse. The most notable are its phishing- and malware-protection schemes, and a tool that can auto-correct misspelled Web addresses.
Chrome's phishing and malware protection put up a warning screen whenever you visit a website that Google has identified as potentially malicious, whether it spreads malware or tries to steal your personal information. Meanwhile, Chrome's URL autocorrect feature usees a Google-provided online service to fix misspelled URLS to help you avoid visiting the wrong site—and perhaps a nefarious site—by accident. Indeed, "typosquatting" is still a threat.

Chrome has several useful features that can help you avoid dangerous sites.

To use these features, open the browser's Settings panel and scroll down to the Privacy section (you may need to click Show advanced settings to get there), and check the boxes labeled Use a web service to help resolve navigation errors and Use a web service to help resolve spelling errors. Also, be sure to check the Enable phishing and malware protectionbox.
Additionally, click the Content settings tab and consider restricting some content. You can, for example, disable JavaScript (which is often exploited by malware) and plug-ins. When you do so, Chrome will notify you when a site is using them so that you can voluntarily opt in for legitimate sites.

Restricting and limiting Web content can help block some types of malware attacks.

Skype

Who doesn’t know about Skype? This amazing free application has billions of users making free voice calls over WiFi and 3G all the time. Skype is one of the most popular service for many iPhone, Android and Windows users, who love to talk to their friends over phone for free. This application is already huge competition to Facebook. The free voice call feature in Facebook originated with the help of Skype earlier. Skype got amazing response and good feedback for embedding their service into Facebook.
skype

Enabling NumLock on by Default in Windows XP

To have numlock turned on for each user:
  1. Start Regedit
  2. Go to HKEY_CURRENT_USER\Control Panel\Keyboard\InitialKeyboardIndicators
  3. Change the value from 0 to 2
  4. Turn Numlock on manually
  5. Log off and back on again.
  6. For all users, make the same change to HKEY_USERS\.DEFAULT\Control Panel\Keyboard\InitialKeyboardIndicators

How do I sleep, restart, or shut down Windows 8?

To Sleep, Restart, or Shut down Windows 8 follow the below steps.

  1. Move the mouse to the right-hand side of the screen or press the Windows key + C to open the Charms.
  2. In the Charms menu click Settings.
  3. Click the Power icon and select either Sleep, Shut down or Restart.
Tip: If the above steps seem like too much work you can create a shutdown, restart, or hibernate shortcut that will allow you to perform any of these tasks faster. To create one or all of these shortcuts follow the instructions on how to create a shutdown or restart shortcut in Windows steps and once that shortcut has been created right-click the shortcut and choose Pin to start.

Additional information

  • See the Charms definition for further information on this term and related links.

Start Button in Window 8

Microsoft is committed to having everyone use the Start screen instead of the Start button found in previous versions of Windows and therefore has no setting to enable or disable the start button. However, there are a few things that can be done to mimic the Windows Start button. Try one or all of the below suggestions to see what works best for you.
Tip: If you're a power user looking for things such as the Command prompt, Computer management, Device Manager, Event Viewer, Control Panel, Windows Explorer, etc. try using the Power user shortcut key ( Windows key + X ) before trying any of the below suggestions.
Create a Windows Start Menu Toolbar
The Start Menu can be made into a toolbar, which will allow you access to all the programs you'd normally see in All Programs. To do this follow the below steps.
  1. Make sure show hidden files has been enabled.
  2. Right-click on the Taskbar and click Toolbars and then New toolbar.
  3. Browse to C:\Program Data\Microsoft\Windows and select Start Menu and choose Select Folder
Once the above steps have been completed you'll have a new Start Menu folder with all your programs in the Programs folder.

How do I view hidden files in Windows?

To view hidden files in Microsoft Windows, perform the below steps. When enabled, you will be able to distinguish a hidden file from other files by looking at the icon. Hidden files will appear as if they are faint (slightly grayed out). You can also look at the file attributes to see if it is a hidden file.
Note:It is important to realize that files can also be hidden using a software program or other commands. In order to view these files, you need access to the program used to lock the files. Files may also have file permission rights that allow or prevent users from viewing the files. In order to view these files, you must be given the appropriate rights by the administrator or super user.

Windows 8 users
  1. Open Windows Explorer or My Computer.
  2. Click View and then Options (as shown in below picture).
  3. In Folder Options click the View tab.
  4. Finally, within the view tab, select the option Show hidden files and folders as shown in the other picture and then click Apply and then Ok.
Windows 8 Folder Options
Windows 9x, XP, Vista, and 7 users
  1. Open Windows Explorer or My Computer.
  2. Click the Tools drop down menu. If you don't see the Tools option try pressing Alt.
  3. Click either Folder Options or Options.
  4. Click the View tab.
  5. Within the view tab, select the option Show hidden files and folders as shown in the below picture and then click Apply and then Ok.
Windows Folder Options

System Requirements For Windows 8

Windows 8, codenamed Midori is a version of Microsoft Windows released October 26, 2012 and is one of the biggest changes Microsoft has made to their operating system since Windows 95. It features some new programming and technology to allow it to run quicker and provide a better look and feel to users. It will not only be available for desktop and laptop computers, but it will also be available to some tablet computers. Windows 8 includes a tablet interface, called Metro, which is compatible with touch-screen displays, like those on a tablet computer. Users can still use the standard windows desktop interface as well, if they prefer. Below is an example of the new Windows 8 Start screen, which replaces the start button.
Windows 8
Windows 8 is available in 32-bit and 64-bit versions and include Internet Explorer 10, as well as natively support USB 3.0. Users will have the option of using a Microsoft account to login to Windows 8 or even two other new authentication methods (picture password and PIN log in). The standard Task Manager has been redesigned, as has the Windows Defender security software, which will include anti-virus capabilities. Microsoft has also built Windows 8 to integrate with Xbox Live. To run Windows 8, a computer will need to have a 1GHz or higher processor, 1GB (32-bit) or 2GB (64-bit) of RAM, 16GB (32-bit) or 20GB (64-bit) of available hard drive storage and a DirectX 9 or higher graphics card.
Windows 8 system requirements
1GHz processor or faster 32-bit (x86) or 64-bit (x64)
1GB of RAM for 32-bit or 2GB of RAM for 64-bit
16GB of hard drive space for 32-bit or 20GB for 64-bit
DirectX 9 graphics device with WDDM 1.0 or higher.

Charms of window 8

The Windows Charms is a new feature that was introduced with Windows 8 that gives you access to Search, Share, Start, Devices, and Settings. This menu appears when you move you mouse on the right-hand side of the screen or press the Windows key + C on the keyboard. The black bar along the right-hand side of the below picture is an example of what the Windows Charms looks like when open.
Windows 8 Charms
Description of each of the Windows 8 Charms

  • Search (shortcut: Windows key + F) - Find and open any program or file.
  • Share (shortcut: Windows key + H) - Share and send links, photos, and more to your friends and social networks in the app currently open.
  • Start (shortcut: Windows key) - Open the Windows 8 Start Menu.
  • Devices (shortcut: Windows key + K) - List available devices, for example a second screen.
  • Settings (shortcut: Windows key + I) - View Start Settings, view settings such as battery monitor, volume, brightness, notifications, and the power (to shutdown computer). In Settings you'll also find More PC Settings at the bottom of the menu, which will give you all available settings that can be adjusted.

    Use a picture password to log into your computer in window 8

    Windows 8 includes a new feature called Picture password, which allows you to authenticate with the computer using a series of gestures that include circles, straight lines, and taps. Enable this feature if you want a new way to access your computer or have a hard time with passwords.

    1. Open the Windows Charms.
    2. Click Settings and then More PC settings
    3. In the PC settings window click Users and then select Create a picture password
    Bonus tip: A four digit pin password can also be created and used to access your computer.

    Windows 8 Task Manager

    The Windows 8 Task Manager has been significantly improved over previous versions of Windows. Some of the new changes include showing a total percent usage at the top of your Processes, which makes it easier to determine total memory and CPU usage, improved Performance graphs, a Startup tab to see startup processes and their impact to system performance, and the App history tab (as shown below) that gives you the total resources an app has used over a period of time. Press Ctrl + Shift + Esc to start exploring the new Task Manager.
    Windows 8 Task Manager

    Customize your tiles In Windows 8


    Windows 8 tiles
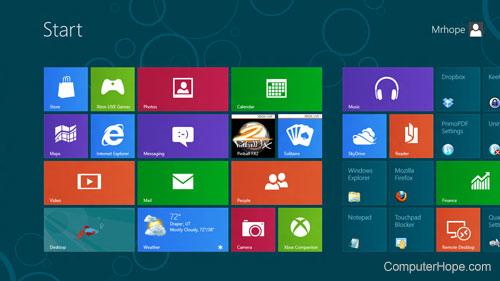
Make the most of your Windows Start screen tiles by adjusting the sizes, where they are located, and what is listed.
    • Move any tile by clicking and dragging the tile. While moving a tile, if you need a larger view of the Start screen move the tile towards the top or bottom of the screen to zoom out.
    • Use your mouse wheel to scroll left-to-right through your tiles.
    • Any Desktop shortcut or program can be pinned to the Start screen by right-clicking the icon and choosing Pin to Start.
    • In the bottom right-hand corner of the start screen is a magnifying glass with tiles, click this icon to get a zoomed out view of your Start screen. In this view, if you right-click on a group of tiles you'll be given the option to name group, which can be useful if you have a group of related tiles (e.g. games). In this view, you can also click and drag a group to organize your tile groups.
    • Create a new speed bump between tile groups by moving a tile to a speed bump.
    • Resize any User tile or Live tile by right-clicking the tile and choosing resize.
    • If there is a tile you want on your Taskbar, right-click the tile and choose Pin to taskbar.
    • Show admin applications on the Start screen by clicking Settings in Charms, click Settings, and change the Show administrative tools from No to Yes.
    • In Internet Explorer 10, you can also pin any of your favorite web pages to your Start Screen.

    Tuesday, March 26, 2013

    Creating a Shutdown/Reboot Icon in window XP

    WindowsXP has a program called SHUTDOWN.EXE which allows you to easily create icons to shutdown or restart your computer.
    To create a shutdown shortcut on the desktop:

    1. Right click on an open area of the desktop
    2. Select New / Shortcut
    3. Enter in "shutdown -s -t 00" - no quotes
    4. Press the Next button
    5. For the name, enter in anything you like. I just use shutdown. Click on the Finish button.
    For a reboot, enter "shutdown -r -t 00"
    Shutdown [{-l|-s|-r|-a}] [-f] [-m [\\ComputerName]] [-t xx] [-c "message"] [-d[u][p]:xx:yy]
    Parameters
    • -l - Logs off the current user, this is also the defualt. -m ComputerName takes precedence.
    • -s - Shuts down the local computer.
    • -r - Reboots after shutdown.
    • -a - Aborts shutdown. Ignores other parameters, except -l and ComputerName. You can only use -a during the time-out period.
    • -f - Forces running applications to close.
    • -m [\\ComputerName] - Specifies the computer that you want to shut down.
    • -t xx - Sets the timer for system shutdown in xx seconds. The default is 20 seconds.
    • -c "message" - Specifies a message to be displayed in the Message area of the System Shutdown window. You can use a maximum of 127 characters. You must enclose the message in quotation marks.